Imaginando
DRC Help - Modifiers
In this panel you get to control all the available modulation sources (EG 1, EG 2, LFO 1, LFO 2) and also the Arpegiator. This various modulations are then fed through the synth and give life and movement to the sounds. They are fed to the Oscillators, Filter and even to the Delay and Reverb Effects.
EG’s (Envelope Generators) are essential to make notes sound and behave like an instrumento is supposed to sound, giving the notes a defined beginning, duration and eventually an end.
The Arpeggiator is a module which takes the notes you play and converts them to a rhythmic progression of notes, which are played automatically in sync with the master tempo of the DRC or of your project (if used in the context of DAW - Digital Audio Workstation).
Envelope Generators

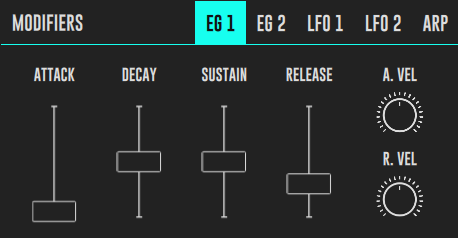
EG stands for Envelope Generator. EG’s generate a control signal that resembles the envelope of real instruments (or not), generated when you hit it, or pluck a string, or whatever. You can control 4 major parameters, ATTACK, DECAY, SUSTAIN and RELEASE and with these construct any kind of sound behaviour.
We used a novel method which even gave the name to the whole synth (DRC - Digital Resistor Capacitor) to make our envelopes. This gives them a completely foolproof analog behaviour, because they are truly analogous of a real ADSR that charges a capacitor through a resistor.
In DRC you have two EG’s, one used by default in the VCA and the other hardcoded to the Filter Envelope.
Parameters
-
ATTACK - The attack is the initial slope of the ADSR envelope. This slider defines the time it takes for the envelope to grow from 0 to its maximum amplitude. As the name implies it mimics the attack characteristic of instruments. You can dial fast, almost instantaneous attacks, or very slow ones. If you use the fastest possible attack you may hear a click in the beginning of each note, this is because you instantly switch on the VCA and it picks the sound waveform at a random point which may not be when it is crossing zero, this creates a click, typical of analog synths. If you want to avoid this click simply add a little bit of attack.
-
DECAY - The Decay slider controls the amount of time the envelope takes to go from its maximum value, after climbing the attack slope, to the value dialed in the SUSTAIN slider.
-
SUSTAIN - As long as you are pressing a key, the place where the envelope amplitude rests is the SUSTAIN level. The envelope does the Attack and Decay movements and rests at SUSTAIN value, so you can say this is the actual nominal level of a note pressed. If you use a low sustain you emphasise the ATTACK and DECAY part of the envelope giving rise to more percussive results.
-
RELEASE - The RELEASE is the time it takes after you released a key, for the envelope to go from the SUSTAIN level to zero. It’s the tale of the note if you like.
-
A. VEL - This knob allows you to relate the velocity (force) with which you press a key to the ATTACK time. At mid position it does nothing. Turning it clockwise increases ATTACK time as velocity increases. Turning anti-clockwise decreases ATTACK time as velocity increases.
-
R. VEL - This knob allows you to relate the velocity (force) with which you press a key to the RELEASE time. At mid position it does nothing. Turning it clockwise increases RELEASE time as velocity increases. Turning anti-clockwise decreases RELEASE time as velocity increases.
Low Frequency Oscillators

LFO stands for Low frequency Generator. As the name implies this is a special type of Oscillator which creates a slow moving waveform, below audible. This waveforms are used to control all sorts of parameters throughout the synth. This gives life to sounds, making them evolve in time. We use 2 LFO’s in DRC and both have many different waveforms for you to choose from. LFO’s can be delayed and Synced to master tempo.
Parameters
-
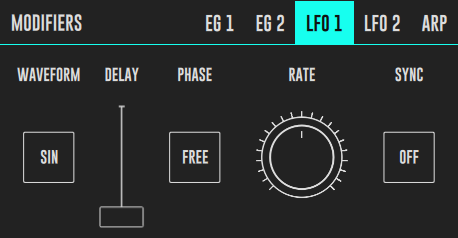
WAVEFORM - This toggle button chooses between the different waveforms. You can choose between 6 different waveforms: SIN (Sine), SQR (Square), SAW (Sawtooth), TRI (Triangular), S&H (Sample and Hold) and F S&H (Filtered Sample and Hold). These are the usual waveforms, also present in the audio Oscillators, with the exception of Sample and Hold in its plain forma and Filtered form. Sample and Hold is made by sampling at a slow rate the amplitude of a random or noise waveform. The result is a stepped random waveform. Filtered Sample and Hold is a king of Sample and Hold, but instead of steps the value ramps from one random position to the other smoothly.
-
DELAY - The DELAY in the LFO is the time it take from the moment you press a key for the LFO to start kick in. Also ramps up smoothly. This is very useful for instance to make string vibrato kind of sounds.
-
PHASE - This slider ties the phase, or the beginning of the oscillation of the LFO to a key being pressed. If free, the LFO runs free unaware of any keys being pressed. If in KEY mode, it resets itself anytime you press a key, this can be crucial in some situations allowing you to have a more defined and predictable effect.
-
RATE - This knob controls the frequency at which the LFO oscillates. It behaves differently depending if SYNC toggle is pressed or not. If SYNC is ON it allows only for the frequency to be changed in defined fractions of the master tempo and not continuous frequency values.
-
SYNC - This toggle ties the frequency of the LFO to defined fractions of the master tempo (BPM. You need to manipulate the RATE slider to change the desired fraction. This feature is used to make synchronized movements with the sound. The values range from 2 Beats to 1/128 Beats.
-
LFO 1 (LFO 2 Only) - This additional slider, only in LFO 2, allows for the modulation of LFO 2 with the waveform coming out of LFO 1. This way you can make LFO 2 behave in an even more dynamic way, changing it rate with time.
Arpeggiator

Parameters
-
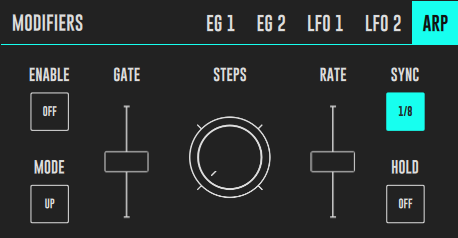
ENABLE - activates/deactivates the arpeggiator module.
-
MODE - allows to choose in-between different melodic patterns for the triggered chords; currently, five modes are available:
- UP (plays the notes in ascending order)
- DOWN (plays the notes in descending order)
- UP/DOWN I - plays the notes in ascending followed by descending order
- UP/DOWN II - just like UP/DOWN I but repeats the previous before inverting direction
-
RANDOM - the notes order are played in a stochastic sequence
-
GATE - defines the time each note is on/off at each arpeggiator trigger period. Musically this results in more staccato or more legato articulation of the played notes.
-
STEPS - allows to choose the number of steps in the generated arpeggio; if for instance you play a single note, this will determine the number of octaves arpegiatted on top and on bottom of that note (depending on the selected mode).
-
RATE - controls the trigger time interval for the arpeggiator (i.e.: 1/4th note, 1/8th note, 1/8th note triplet, 1/16th note, 1/32nd note, etc.)
-
SYNC - syncs the rate to synthesizer tempo.
- HOLD - chooses whether to hold the notes, allowing to sustain them until pressing the next key