Imaginando
Setup - LK Help
LK communicates with Ableton Live and any MIDI compliant software via our custom bridging tool, ‘UBRIDGE’, which needs to be installed on the PC or Mac that you wish to control.
You can connect LK to UBRIDGE wirelessly over a local WIFI network, or via USB cable from device to computer. A wired connection offers the lowest latency and best stability, whereas wireless latency will depend on network conditions such as distance to router, interference, etc.
Note: Network security software such as firewalls can block wireless connections between UBRIDGE and LK - you may need to define custom rules to specify that the connection should be allowed.
Start by downloading and installing UBRIDGE.
The first time you open UBRIDGE, Windows Firewall will ask you to allow it to use the network connection. Ensure both private and public are ticked, then click ‘Allow access’.


The UBRIDGE application window consists of three sections:
- MIDI settings - MIDI input/output ports.
- Control Surface - Ableton Live installations with LK Control Surface script installed.
- Devices - Mobile devices currently connected to UBRIDGE.
Configuring UBRIDGE to use LK
To configure UBRIDGE to use LK we need to perform the following steps while the LK tab is selected (green):
- Configure MIDI Input and Output ports.
- Install the LK control surface onto Ableton Live.
Configure MIDI Input and Output ports
On Mac, simply select ‘UBRIDGE Virtual Input’ and ‘UBRIDGE Virtual Output’- these virtual MIDI ports are automatically created for you by macOS.
If you are on Windows, you need to install a virtual MIDI driver. We recommend Tobias Erichsen’s loopMIDI. After installing and opening loopMIDI, create a new virtual MIDI port by typing ‘UBRIDGE Virtual’ into the port-name field and then click the + icon.
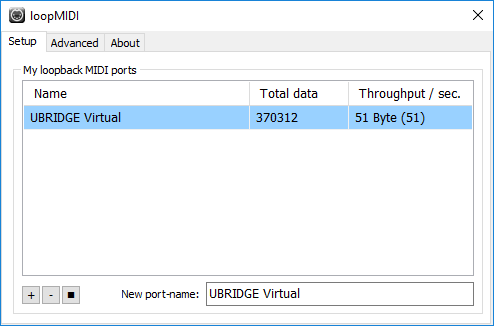
Note: If you have installed loopMIDI after opening UBRIDGE, you will need to restart UBRIDGE in order for the virtual MIDI ports to be listed.
Once you have configured UBRIDGE input and output MIDI ports, open Ableton Live where the ports should now be listed:
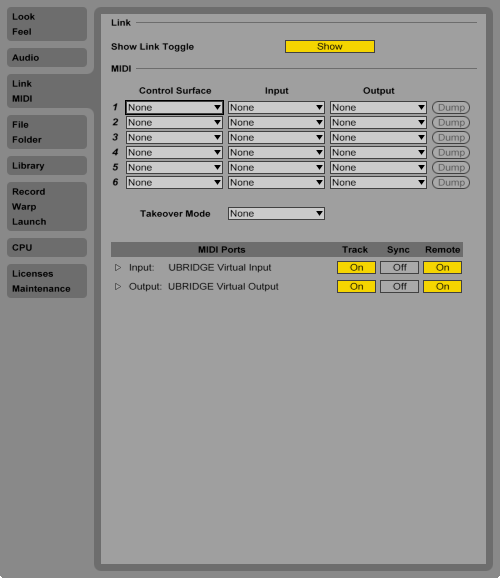
Turn on ‘Track’ and ‘Remote’ for both virtual MIDI ports as shown above.
Installing the LK control surface
This section refers to the installation of the LK control surface which enables LK to work in LIVE mode, controlling the session view of Ableton Live. This lets you use LK to do clip launching and editing, device racks, mixer control and more, just like a hardware controller.
To install the control surface we need to tell UBRIDGE where Ableton Live is installed. Drag the Ableton Live application onto the Control Surface section of the UBRIDGE window. This procedure varies slightly depending on whether you are on Mac or Windows.
Close Ableton Live before performing the following steps:
Mac: Open a Finder window and click on Applications. Find Ableton Live on your applications list, drag it over UBRIDGE Control Surface section. Attention: dragging from the Dock will not work.
Windows: To locate your Ableton Live .exe file, open Windows start menu, find the shortcut for Ableton Live, then right click and select ‘More>’ and ‘Open file location’. This will open the Windows explorer and show the shortcut. Right click the shortcut and select ‘Open file location’. Drag the Live .exe onto UBRIDGE Control Surface section. Attention: You must use the Live .exe file, using a shortcut will not work.
Note 1: As an alternative you can click the + sign on UBRIDGE’s Control Surface section to open a file dialog and manually navigate to the Ableton Live program file.
Note 2: If you have more than one version of Ableton Live installed, you will need to install the LK control surface for each version that you wish to use LK with.

Each entry will state the version number of Ableton Live followed by the version of the control surface that has been installed. If the installation was successful the text colour should be green. If the installation fails, the text will be red and the control surface version will be N/A.
To the right of each entry, the three buttons from left to right, allow you to open Ableton Live log, reinstall/update the control surface and uninstall the control surface.
After successful installation, open Ableton Live and setup LK as a control surface:
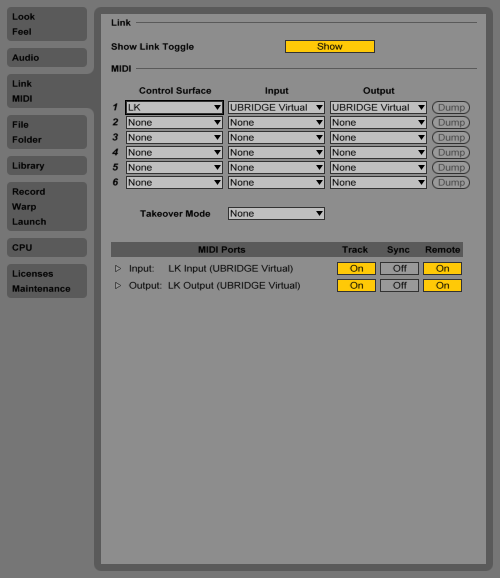
Connecting LK to UBRIDGE
LK can be connected via USB cable or wirelessly using a standard WIFI network.
Connect using USB cable
Connect the USB cable and you should see the device’s name (in case of iOS devices) or the device’s model name (in case of Android devices) listed:

For devices connected via USB cable to be detected you must ensure the following:
- iOS - iTunes is installed on your computer and is up to date. Additionally, you must open iTunes with your mobile device connected at least once.
- Android - USB debugging is enabled on your mobile device. For details on enabling USB debugging, check the Troubleshooting page.
- Accept any device notifications asking you to allow/trust the connection.
Connect using WiFi
Connect the mobile device and computer to the same wireless network. LK app must be open for UBRIDGE to list the mobile device as a connected device. Devices connected via WiFi are listed by their local IP address.
Establishing a connection with LK
You can view available connections from LK’s in-app menu under the Connection section:
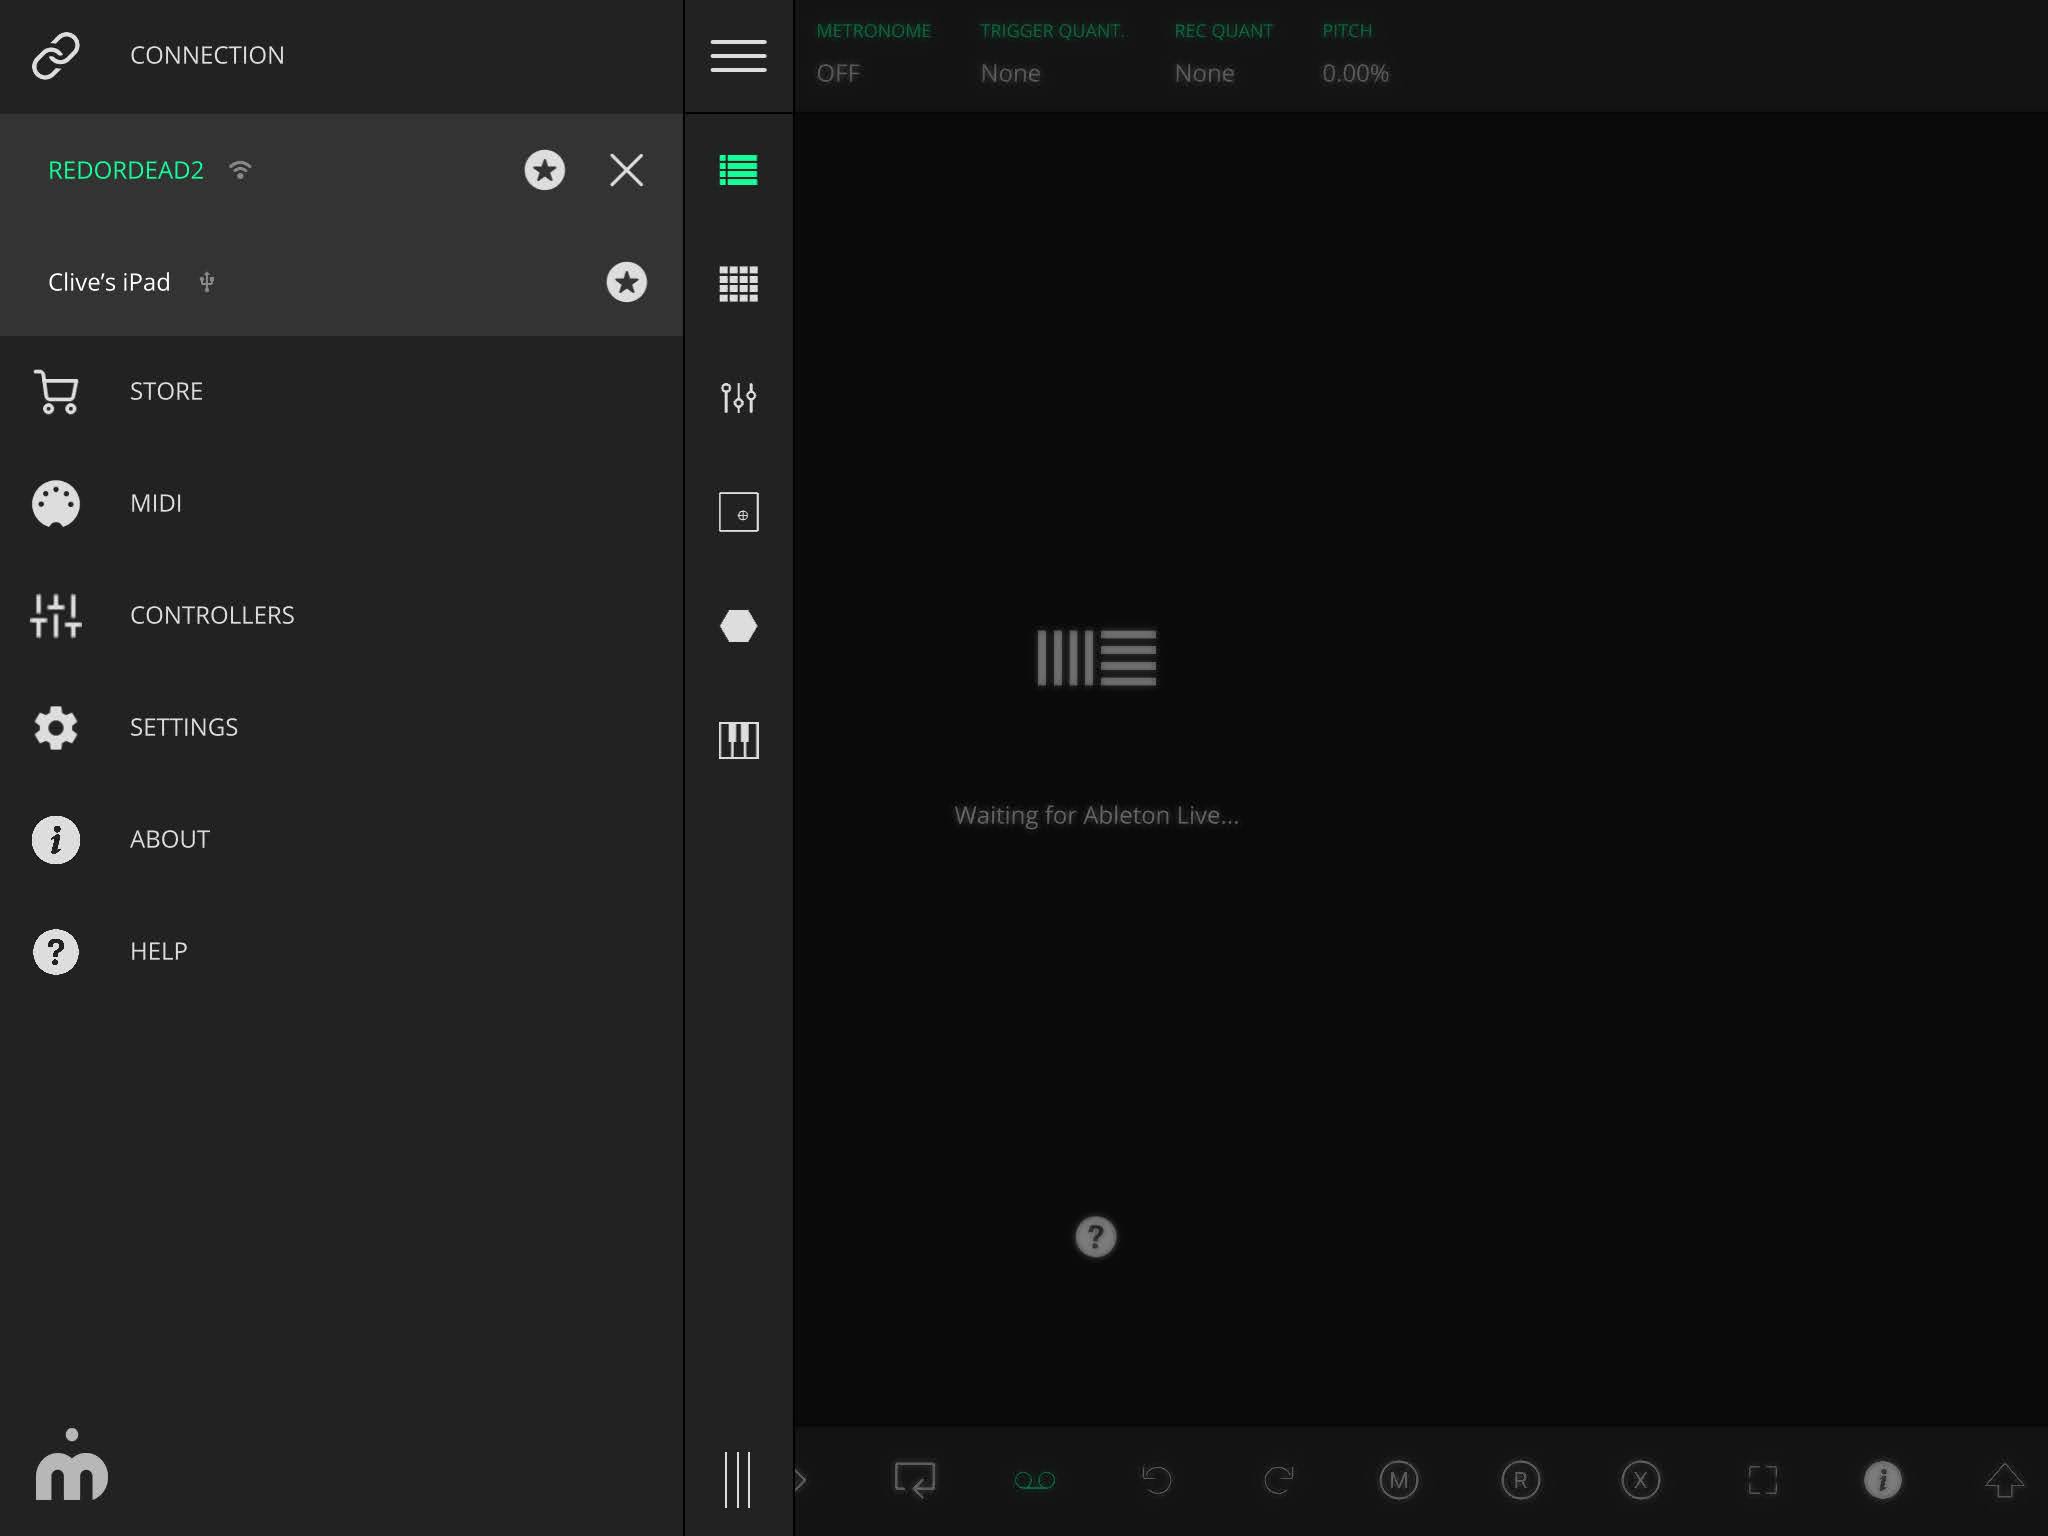
When only one connection is available, LK will automatically connect to it. If more than one connection is available, you can tap each connection name to switch to that connection. If the connection is successfully established, the text will be green.
To connect LK to your running Ableton Live instance, you must select LIVE mode in the status bar. If Ableton Live is not open, the Matrix module will display the message “Waiting for Ableton Live”.
In MIDI mode, LK will behave as an independent MIDI controller, sending MIDI through UBRIDGE and to any subsequent application listening to its MIDI messages.
After opening Ableton Live with LK control surface set up, the full connection will be established and the round trip latency will appear in the connection entry:
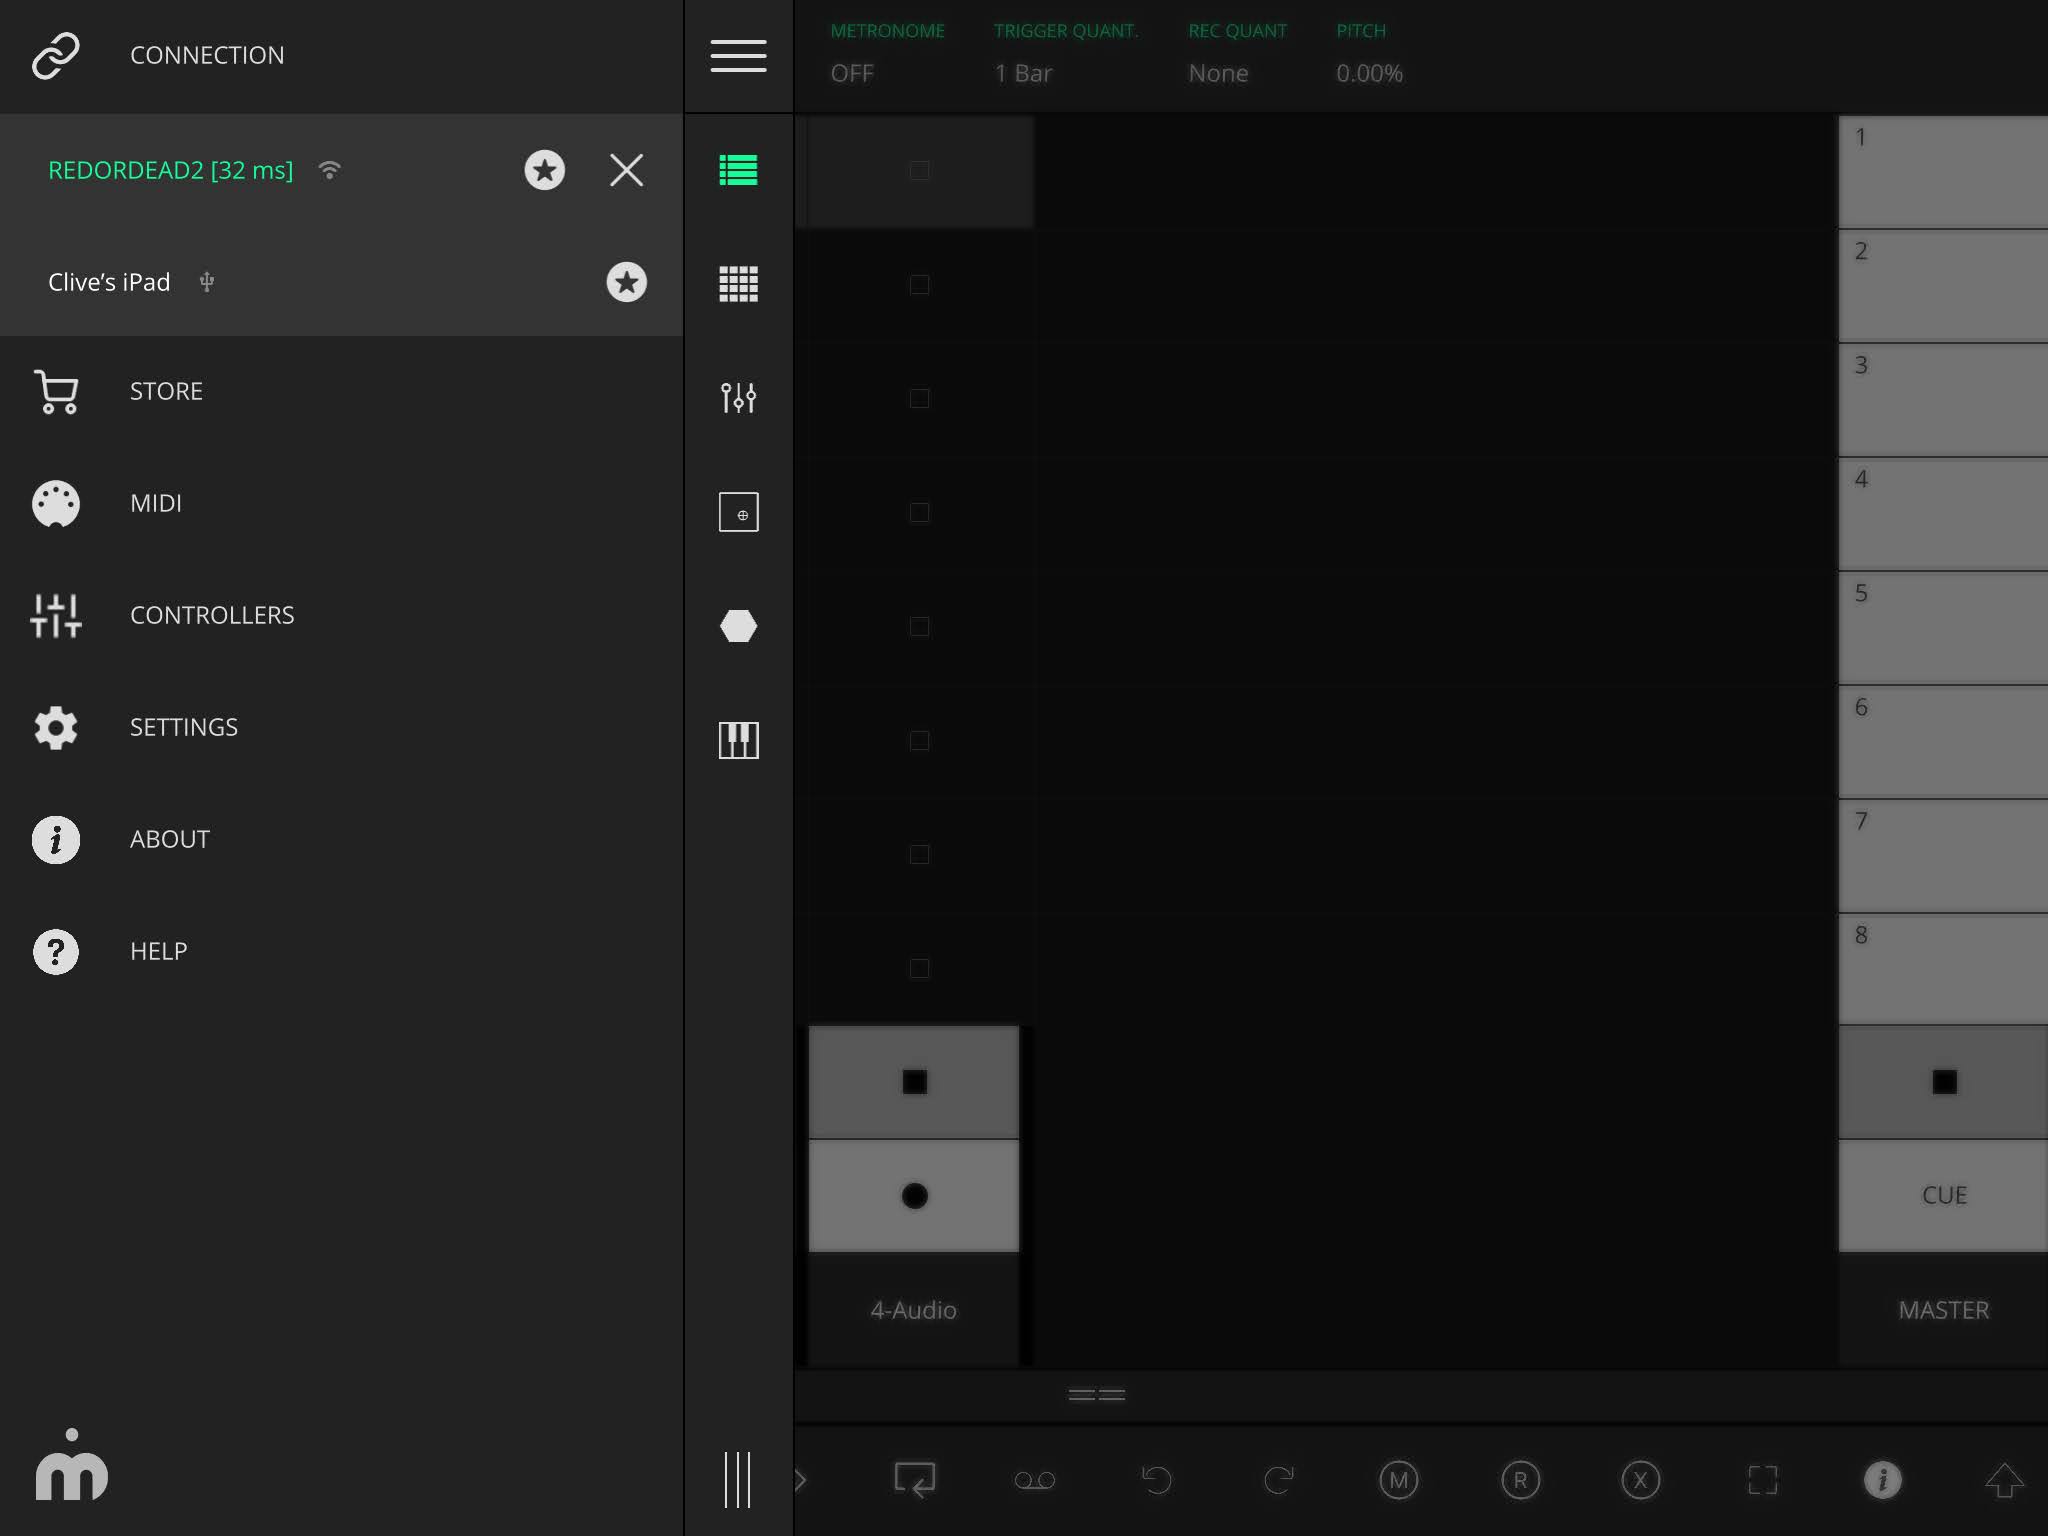
If you want to mark a connection as favorite, tap the star. Next time LK finds that connection it will automatically connect to it. If you are having trouble connecting LK, UBRIDGE and Ableton Live, please take a look at our troubleshooting section before contacting us for support.